Tuesday, November 9, 2010

Periscope Lift

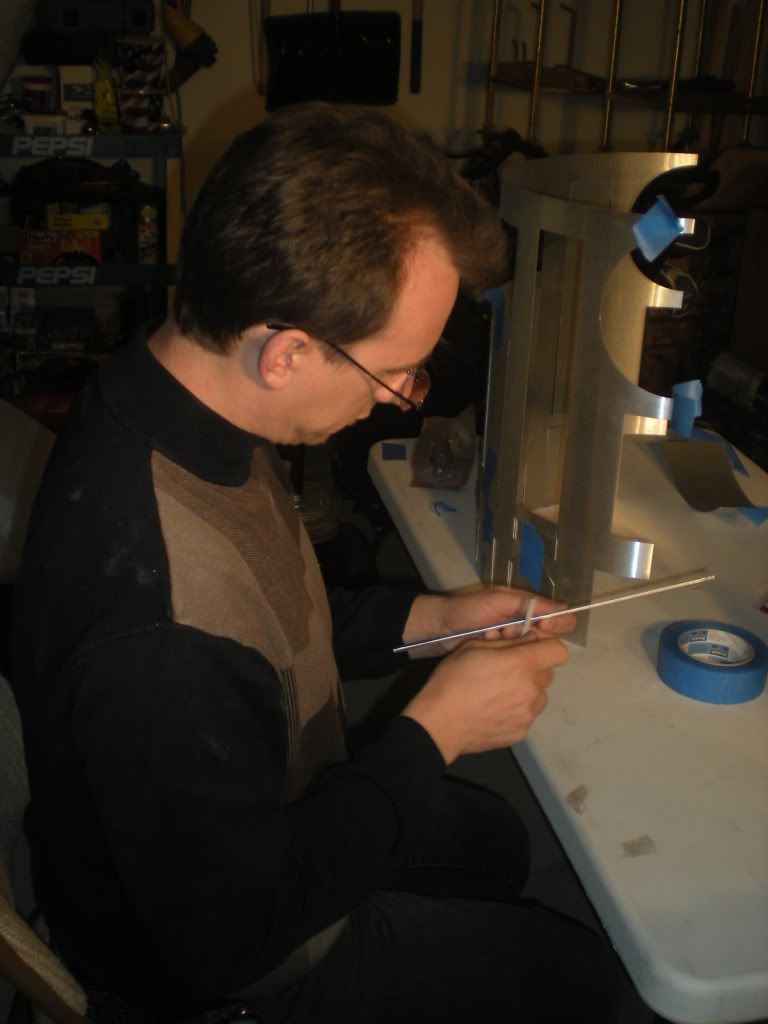
I got to the build night tonight and realized I left my dome panels at home, so I had nothing to work on for R2-NU. Clay has always been good at helping everyone else, so I helped him with his periscope. Clay started out by cutting the periscope opening in R2's dome and seeing how the Periscope he assembled last week (and painted/installed LEDs during the week) fit.


Clay decided to use a modified drawer slide to allow the periscope to slide in and out of the dome.


Clay cut a piece of PVC pipe to raise the periscope to the correct height. Later he will cut that pipe and install a servo to rotate it.


With the work done for the night, we took some pictures of the periscope in the dark with the panel cap installed.

Tuesday, November 2, 2010

Sanding Dome Panels

At our build night tonight I sanded dome panels that were a little too large and did not leave the right amount of gap between them and the surrounding dome. I used a marker to mark the other panels that need to have DAP Plastic Wood added to the corners to increase the panel size.


Jason worked on removing the barbs from his aluminum skins.


Clay worked to clean up/Dremel and assemble the periscope kit he bought from a club offering.

Saturday, October 23, 2010

Quick Dome Assembly

I did a quick dome assembly with the pieces I have painted. I still need to fix the bad spots on the radar eye and paint the center of the holoprojectors with the metallic aluminum spray paint.

Friday, October 22, 2010

Painting Logic Surrounds

I put the last coat of red paint on my dome, painted the white dome ring, painted the radar eye, and put the first two coats on the logic surrounds using the Rust-Oleum Metallic Finish--Aluminum (#7715830) spray paint. There are a still a couple of bad spots on the radar eye I need to fix and then repaint. I need to wet sand the logic surrounds and put one last coat on them.


Tuesday, October 12, 2010

Another Midwest Robots Build Night

Jason and Clay reassembled Jason's custom router table and then tested trimming the bottom frame plate down to size. I repainted my dome a previous night and wet sanded it again to get it ready for a final paint job.

Tuesday, October 5, 2010

Wet Sanding Dome

I finished using the razor blade/sandpaper to get rid of the drops of glue around panel edge openings.


I was wondering if I should sand my dome before painting again. Clay and Jason thought it would be a good idea. Clay suggested I use a 600 grit wet/dry sandpaper.


Nate took a picture of me wet sanding my dome, and I returned the favor by taking a picture of Nate sanding Jason's R5 dome while Jason worked on his skins.

Skin Work

On the first build night in October Jason, Clay, Nate, and I got together to do a little R2 Building. Nate marked his top and bottom frame plates so he could route them out later. Jason worked on separating his skin panels and Clay worked on cleaning my skins (after a previous builder borrowed them to glue up a couple frames and left them a mess). THANK YOU CLAY!!!

Tuesday, September 14, 2010

Painting Dome Inserts

I started painting the dome accessories. I'm using Krylon Fusion Satin White(2420) spray paint (for plastic). I'm putting a thin coat on the logic surrounds so they will accept the aluminum paint later. The radar eye will be completely white and the solid holoprojectors will have a white cowling and an aluminum colored top. I covered the bolts with tape so I wouldn't have a problem later trying to put nuts on them.

Filling Dome Holes

I filled the dome holes/imperfections with gel super glue. Once it dries, I will sand it smooth and try to smooth out some high areas left by the DAP Plastic Wood.

Friday, September 3, 2010

Lens Fitting For Radar Eye

I couldn't sleep this morning. I stayed up late last night watching several games I really didn't care about and was still up by 5 AM today. I think it's because I'm excited about the Huskers playing tomorrow. The game should be an easy win, but Husker football is Husker football.

Since I was up I decided to do a little work on R2's radar eye. I got the lens for the eye back in May, but didn't alter the radar eye to make it fit. After my work smoothing and leveling the eye to get a tight fit against the dome I am only left with preparing the eye for the lens and painting it.

I will need to use a Dremel to grind away part of the rear edge of the radar eye center hole so the radar eye and lens sits flush against the dome. I determined what a level distance would be from the front edge of the radar eye and made marks. This took a little work because the eye is not a consistent size all the way around the center hole. Once the marks were in place I added tape to serve as a guide while I'm using the Dremel. Once the tape was in place, I cut the tape hanging out the front side of the radar eye hole so it would hold in place and not bend while grinding.


I used the lens to draw lines on the back of the radar eye so I know how much to grind away.

Wednesday, September 1, 2010

Painting Stopped

I added a couple more coats to the dome and decided that I needed to fix a fix dome imperfections. I need to fill in some small holes created when adding the holoprojector mounting screws and sand a couple of DAP Plastic Wood areas that are too high. So the painting was stopped and I will start again once the problem areas are fixed.

Sunday, August 29, 2010

Dome Painting Started

I finally started painting the dome. I'm using Red Pepper(2328) Krylon Fusion spray paint (for plastic). I'm not doing the white panels yet. I would like to fit the panel pieces and possibly do a little more sanding on them after seeing them against the red dome before painting them white. When I do, I will be using Krylon Fusion Satin White(2420). I was able to get two coats on before I got complaints about the smell and had to stop for the evening.

Saturday, August 28, 2010

Logic Surround Bolts

I didn't have much going on today, so I finished sanding the dome. I washed the dome and set it aside to dry. Hopefully tomorrow I will be able to do some painting. Since I have my J.E.D.I. system running I figured I better get my front and rear logic surrounds finished.


I started off by centering the plastic J.E.D.I. Display cover for the front logic surround.


I used some linesman pliers to snap the heads off the #6-32 x 1½" bolts so they glued inside the logic surrounds.


I then drilled 1/4" depth holes big enough to accommodate the headless bolts.


I then added some nuts and used one of the logic plates to make sure the bolts stayed straight up and down while they were being glued. One by one, I dripped Tech Bond glue into each hole, sprayed the bolts with an accelerator, and then dropped the bolts in the holes. The accelerator cover bolt hardened within a couple seconds (which allow for quick repositioning and adjusting using the J.E.D.I. plate).


Once the front logic displays were done I followed the same procedure for the rear logic displays. I knew this was going to be the case, but the top and bottom line of LEDs are both half covered (by design) by the surround.

Wednesday, August 25, 2010

Still Sanding

Dome sanding pictures are pretty boring, so I didn't take any more. I sanded the DAP Plastic Wood and I'm getting close to and smooth even dome. After the latest round of sanding there were still some places that needed to be filled and touched up. Hopefully, tomorrow or Friday I will be able to do the last of the sanding and start painting.

Sunday, August 1, 2010

No Work, But Influencing Young Minds

I didn't do any work this weekend, but I was influencing young minds. I was showing my J.E.D.I. Control system to my nephew Christian and Joshua this weekend. They are still too young to start doing any real building, but they love to hear what I'm doing with my R2. Every time I show kids my R2 progress it gets them interested in science and building. Kids usually spend the next hour or so playing with some of my remote control toys and asking several science, electronics, or building questions.

Tuesday, July 27, 2010

J.E.D.I. Controller Problem Solved

As you may have read in a previous post, I was having issues with the J.E.D.I. Controller sending signals to Display Controller. I posted on Astromech.net that I was having an issue. Scott Gray, the creator of the J.E.D.I. Control and Display systems, knew exactly what my problem was.

I previously hooked up the items from the Display Controller and Logic Displays by themselves. When hooked up alone power needs to be run to the Display Controller through the PDCRX pins 2 and 3 (pin 1 is ignored in this case) from the DC/DC Converter. The J.E.D.I. Controller sends signals/power from the PDCTX pins to the Display Controller PDCRX pins (in this case all three pins are use because pin 1 receives the signal). I connected the J.E.D.I. Controller PDCTX pins to the Display Controller PDCTX pins which caused the signals to clash and prevented the Display Controller from functioning properly. I couldn't get past the fact that power did not need to be supplied from the DC/DC Converter when the J.E.D.I. Controller was hooked up.

Everything works great now! The morals of this story: 1) The builders, and Scott Gray, are great and will do almost anything (at all hours of the night) to help a fellow builder and 2) Don't hookup electronics when you are tired.

Monday, July 26, 2010

Slip Ring Connection

I received the slip ring connection boards I ordered from Scott Gray today. These boards are set up to make it easy to feed up to two power sources (which I call power "lanes") through the slip ring to the dome, and 16 signals such as servo signals, motor control signals, or other control signals such as the J.E.D.I. Display Controller serial signal. The signals are set up on 3 pin headers such that servos (and/or extender cables) can be attached directly to the boards, so there is no wiring fuss. Power for the servos are split into two groups of eight and are powered by two individual 2-terminal connectors. This means that it can pass battery power to the dome, convert it using a DC/DC converter to 5V or 6V, and then connect that back to the board to power the servos. This is a very clean solution that prevents having high current pass through the slip ring.

Sunday, July 25, 2010

J.E.D.I. Controller Hookup

I finally hooked up my J.E.D.I. Controller and Display Controller together tonight. When starting up the Display controller everything runs through its start up procedure perfectly. The FLDs, RLD, and PSIs continue to do their random flashing. I can use my joystick commands and the music and/or sounds play, but the random light flashing never changes to match the joystick commands. It's pretty late, so I'll take another look at it tomorrow night. I may also post something on Astromech.net to see if anyone has any ideas.

Saturday, July 24, 2010

Putting Together J.E.D.I. Displays

I got the J.E.D.I. Display package a long time ago, but I was nervous about putting it together for fear that I would hook something up wrong. Clay grabbed his multimeter and helped test the power input for the system. With my power concerns put in check, Clay helped me hookup my display materials. Everything looked great! I just have to tin the ends of my 18 gauge power supply wires and hookup my J.E.D.I. Controller.